This (step 3) assumes that you have completed step 1 and 2 and have a batch of completely scrubbed clean rocks ready to enter the final polish stage.
Our suggestion is that for a final polish, a barrel which is dedicated to polishing at step 3 should always be used. However if funds are tight – then excellent results can be achieved IF THE BARREL AND ROCKS ARE 100% clean of previous stage grits.
So at this point, whether you are cleaning a barrel, or using a new dedicated “polish” barrel, ensure that the rocks themselves are absolutely free of grit before going anywhere near the polish!
Just imagine grit going round and round in the polish – everything the polish (cerium oxide) is doing, will be immediately undone by the rogue grits!
During this step, it is well worth noting that plastic pellets can be placed into the barrel to add some padding / protection to the rounded stones as they go through the final polishing. They will reduce the overall number of harsh impacts which are not required during polishing, but ARE required during grinding and smoothing (to an extent).
Lets assume that we halve the number of impacts with the use of padding such as pellets – this would effectively reduce by half the chances of an unwanted chip appearing in our rounded rocks – spoiling the final outcome.
To perform the final polish, take a look at the rocks which remain and put aside any which are damaged with chips or are not generally the shape you like. You can always place these into another batch tumbling session with the same kind of rock, where they will take on a new form during step 1. This way nothing goes to waste.
Wash the remaining rocks as best you can – they can never be clean enough for this stage. By washing them clean you will protect your polish barrel (if you have a dedicated one) from getting the odd bit of grit in over different batches and it will last longer giving you the confidence to use it on seriously difficult types of rock down the line – such as obsidian.
Place the selected rocks in the barrel as usual and add lots of plastic pellets. As you add them, shake the barrel a bit to let them sink in and fill all the spaces. Then add more until they are level with the top of the stones.
Then place 1 roughly heaped tablespoon of cerium oxide or aluminum oxide into the mix per pound and a half of rock. Again, this is not an exact science – be sparing rather than over enthusiastic though as the polish can be fairly expensive.
Add water to the mixture until it reaches the tops of the rocks then fasten the lid on.
The absolute LESS amount of time the barrel is turning at this stage the better, because the longer it rotates, the more chips and pits will occur on the surface of the rocks. For this reason, we suggest checking the barrel every day or so after the first 4 days. You will get used to which types of rock take a polish quicker than others – Amethyst for example shines up really quite quickly, whereas Obsidian can be a pain!
When you check them, take two or three pieces out and run tap water over them to remove any residue of oxide sticking to them. They will look stunning here, shiny and finished, but mainly this may be because they are just wet. Take a towel and dry them thoroughly to examine them. Once they are dry, hold them up to a light to see how deep the polish runs, well, not quite upto a light, but try and get a light source such as a long florescent tube type to reflect across them.
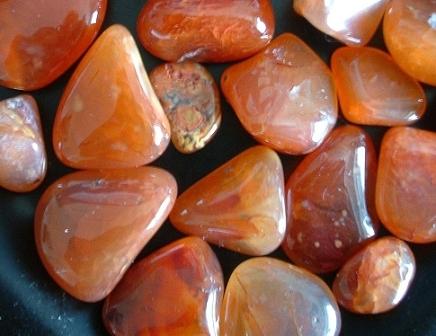
If you are happy that the shine is where you want it to be, then the rocks are complete and the batch is finished.
Congratulations – you have just used a rock tumbler to produce highly polished semi-precious gemstones!